

 >
>


This tutorial is aimed at mac users.
TOC:
- Install Xcode
- Install Homebrew
- Install Python
- Install pip
Stefan’s blog post
—–
For this project, we will be setting up and running a neural network on a Google Computing Cloud instance, taking advantage of the newly offered GPU resources from Google to speed up deep learning calculations.
Install Xcode:
Xcode is Apple’s Integrated Development Environment (IDE). Downloading Xcode is a must if you plan to program on your Mac, as you will need the tools that come with Xcode for future projects. Install it by visiting Apple’s app store.
Install the command line tools by running xcode-select --install. You’ll most certainly need them later on (e.g. installing Homebrew).
Install Homebrew:
Homebrew is a package manager for OS X. To install it, run the following in your terminal. Homebrew will allow you to install software easily through your terminal.
/usr/bin/ruby -e "$(curl -fsSL https://raw.githubusercontent.com/Homebrew/install/master/install)"Installing Python:
Check if you have python installed already by running python --version in the terminal (Python comes with OS X, so you can usually skip this step if you have a Mac). If you get a number similar to “Python 2.7.10”, you already have python and can skip this step. If you get an error message, install python with Homebrew by running brew install python.
Install pip:
“pip installs packages” (pip) is a package managing system for software written in python. If you have a Mac with python already installed, you can simply run sudo easy_install pip to install pip. Otherwise, follow the official install instructions.
Install Virtualenv
Virtualenv allows you to use different versions of python for different projects. Handy if a certain project works with only Python 2, but another project needs Python 3. Install it by running pip install virtualenv.
Install Google Cloud SDK
Install by following the official directions.
I ran into some issues installing Google Cloud SDK. To fix my issue, I had to manually add in the path to the installed sdk folder into my “.bash_profile” file. Here’s a quick list of steps if you use a bash shell.
- Go to your home directory by typing in cd ~
- vim into .bash_profile (or use a text editor of your choice). Apple automatically hides configuration files, so if you need help seeing whether you’re in the correct folder, type in ls -a to view hidden files.
- Add your version of the following line to “.bash_profile”:
source ~/…/google-cloud-sdk/path.bash.inc
If you use a zsh shell, you’ll need to follow these steps:
- Go to your home directory by typing in cd ~
- vim into .zshrc (or use a text editor of your choice). Apple automatically hides configuration files, so if you need help seeing whether you’re in the correct folder, type in ls -a to view hidden files.
- Add your version of the following line to “.zshrc”:
source ~/…/google-cloud-sdk/path.zsh.inc
Your Mac should now be registering the gcloud command.
Set Up Google Cloud Platform Account
If you don’t already have a Google Cloud Platform account, you can create a new one. First time sign ups qualify to receive $300 in credits to use for the next 12 months, so have fun running whatever computing clusters you can. There’s a caveat however: in order to use Google Compute’s GPUs, you’ll need to upgrade your account from the free trial to the full version. As long as you stay below your $300 free credits, you won’t be charged.
WARNING: In the case for using Google’s GPU services, you will need to upgrade your account to a paid account. After you are done with your project, DEACTIVATE YOUR BILLING ACCOUNT (or you will be charged monthly).
Once you have your Google Cloud Platform account up and running, let’s create a new project called “Neural Net Setup”.
Creating a New Google Cloud Platform Project
- Go to the Google Cloud Platform Console.
- Click on the “select a project” button located on the top bar. By default, it shows your current project name (which should be “My First Project” if you just created a new account).

- Click the “+” button located on the top right corner of the “Select” dialog box.
- Name your project. For convenience, let’s just name it “Neural Net Setup”.
- Click the “select a project” button again, and select “Neural Net Setup” to begin working on this project.
Allocate GPUs to Use for Your Project
- If you haven’t already, upgrade your account from the free trial to the full version. Otherwise, you will be unable to see the NVidia K80 GPUs listed in the quota page.
- Request a quota increase for GPU’s from the quotas page. When you’re on the quotas page, select our project. You’ll see a filter box located at the top. Change the “Metric” field by opening the drop down menu, selecting “none”, and then searching for and selecting “NVidia K80 GPUs” by typing it into the search field.
WARNING: At this step, I ran into an issue of not being able to see “NVidia K80 GPUs” listed as an option. Try resetting your cookies, or requesting for a quota upgrade multiple times. Eventually it should pop up. This was extremely frustrating, and I hope Google fixes this bug soon. - Go to the “VM instances” page and create an instance.
- You’ll need to fill out multiple fields. Any fields that I do not mention were left on default. Here’s how I configured it:
Name: anything you want, I left it on default.
Zone: choose a zone that provides GPUs. Since I’m in the west coast, I’ll choose the “us-west1-b” zone.
Machine Type:
– Cores: 4 vCPU
– Memory: 15 GB
– # of GPUs: 1
– type of GPU: NVIDIA Tesla K80
Boot Disk:
– OS Image: Ubuntu 16.04 LTS
– Boot Disk Type: SSD, 20 GB
Management, disks, networking, SSH keys
– Automatic restart: Off - Log onto your gcloud account from your terminal:
gcloud auth login - Configure your project (minus the brackets):
gcloud config set project <id>. You can find your project id by clicking the following button:
- Access the “VM Instances” page on your Google Compute account. Click “View gcloud command” and run the command on your local terminal. You will have to create a ssh private and public key pair to connect to your instance. After you’ve set up your ssh keys you can also use SSH port redirects to connect to your instance by running:
ssh -L 8889:localhost:8888 computer_usernap@EXTERNAL_IP
you can find EXTERNAL_IP on your VM instances page.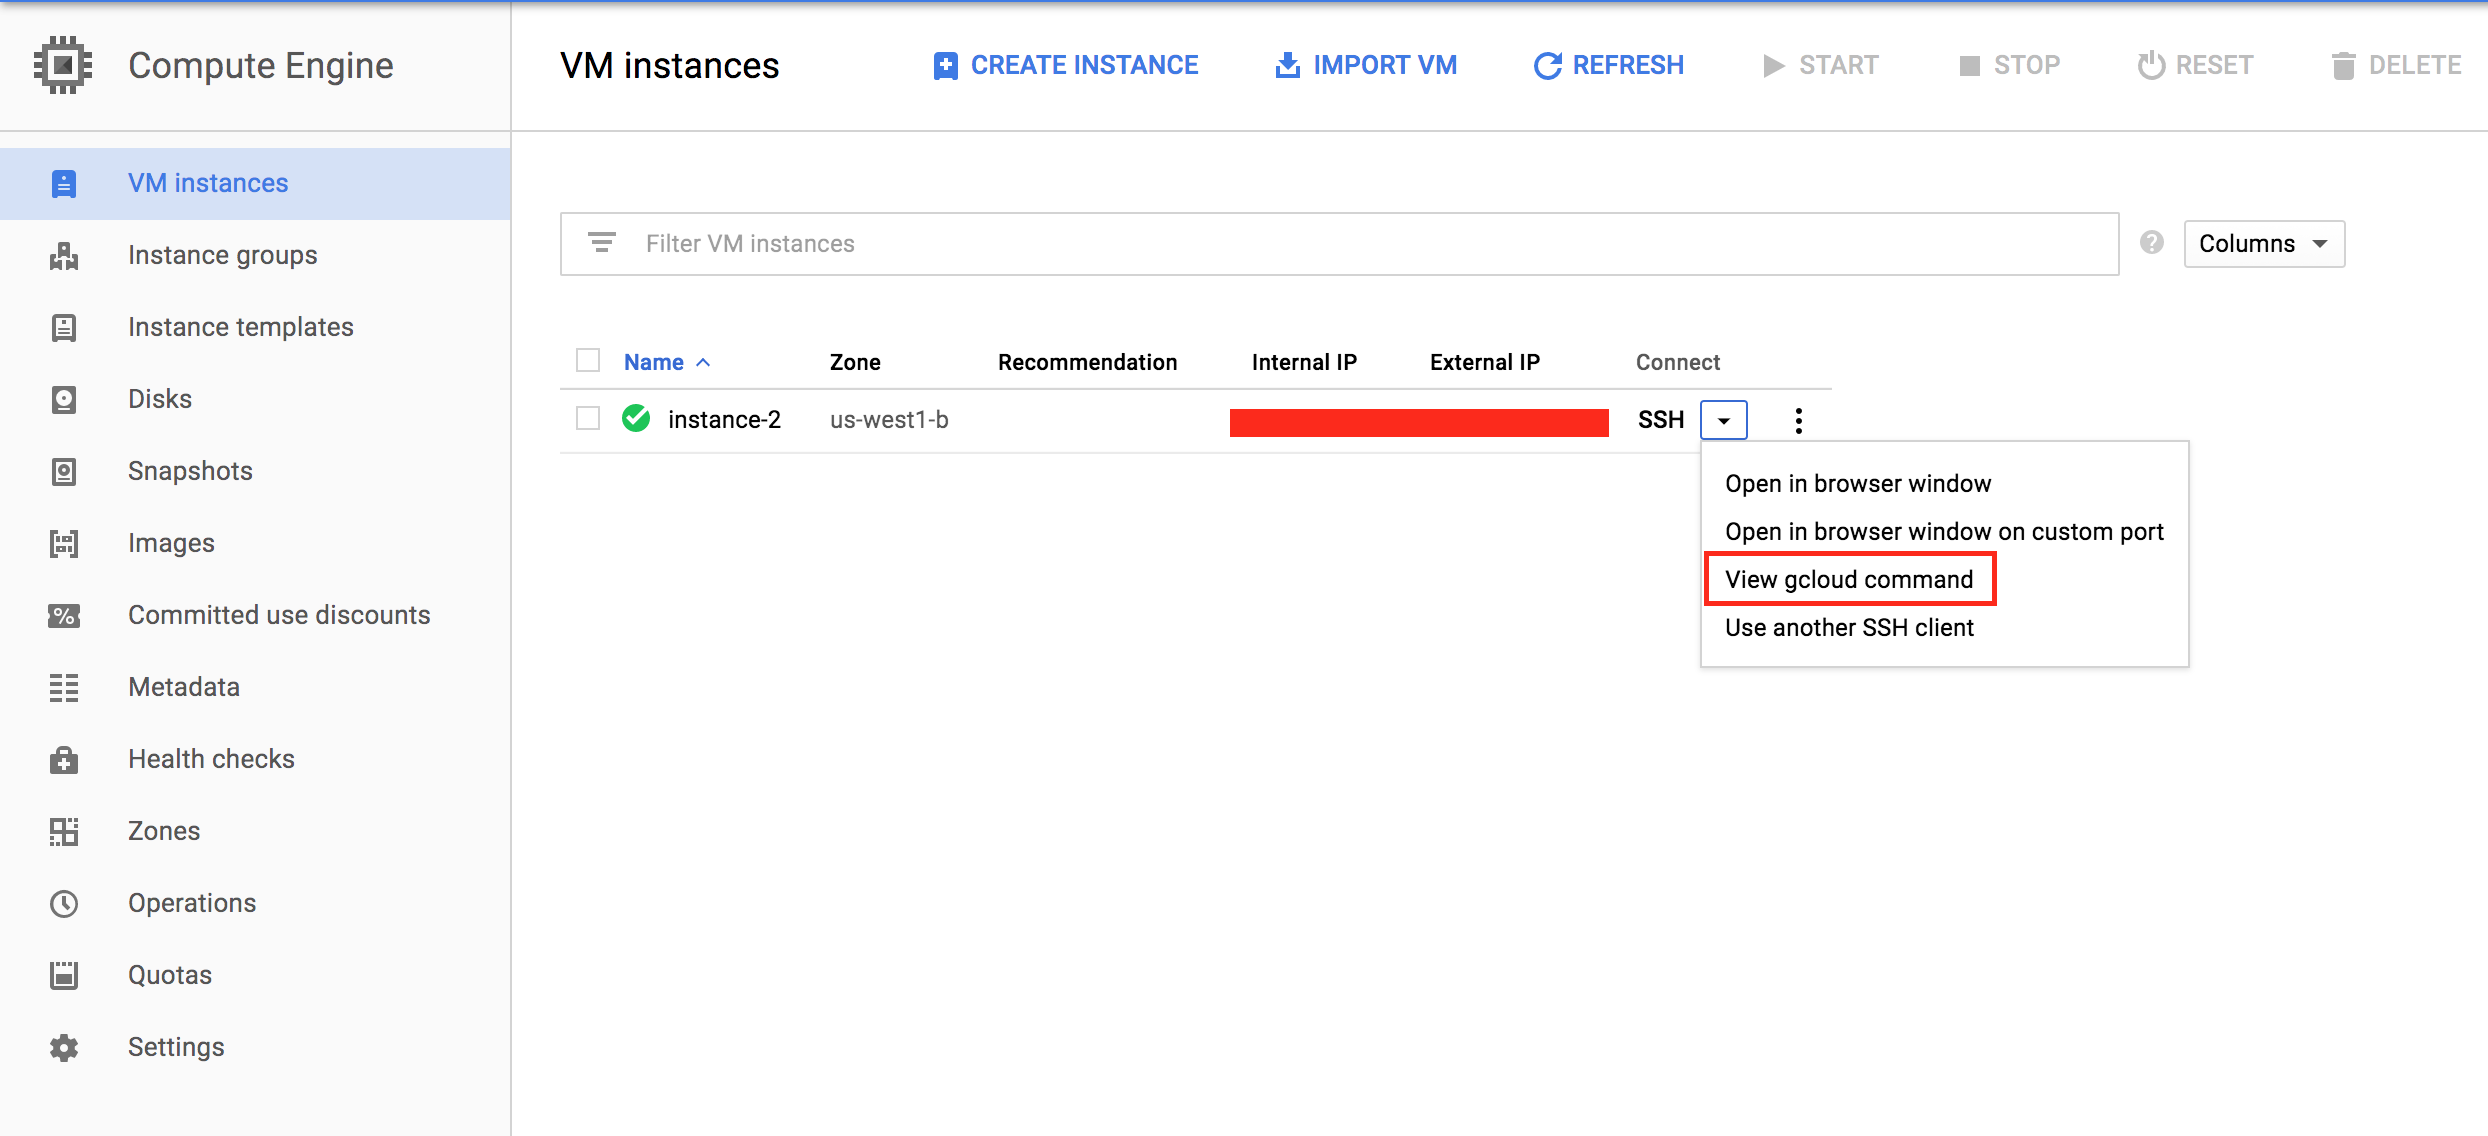
- Now that you’re logged into your instance, we are ready to download all the necessary NVIDIA Drivers and CUDA.
Install NVIDIA Drivers and CUDA
- Referencing the GCE documentation, we’ll create the script to install CUDA directly onto our instance server. In the pop up terminal, do the following:
touch cuda_install.sh
vim cuda_install.sh
press “i” for insert mode, and copy paste the following into the file:#!/bin/bash
echo "Checking for CUDA and installing."
# Check for CUDA and try to install.
if ! dpkg-query -W cuda; then
# The 16.04 installer works with 16.10.
curl -O http://developer.download.nvidia.com/compute/cuda/repos/ubuntu1604/x86_64/cuda-repo-ubuntu1604_8.0.61-1_amd64.deb
dpkg -i ./cuda-repo-ubuntu1604_8.0.61-1_amd64.deb
apt-get update
# apt-get install cuda -y
apt-get install cuda-8-0
fipress “esc”, then type in “:wq” to save and exit the file.
- Allow execute permission of the file by running
chmod 755 cuda_install.sh. - Execute cuda_install.sh by running
sudo ./cuda_install.sh - IGNORE IF YOU DON’T HAVE PATH ISSUES: Edit your .bashrc file by doing the following steps:
vim .bashrc- add the following lines to the bottom of the file:
export CUDA_HOME="/usr/local/cuda-8.0"

export LD_LIBRARY_PATH="${CUDA_HOME}/lib64"
source .bashrcto update changes.
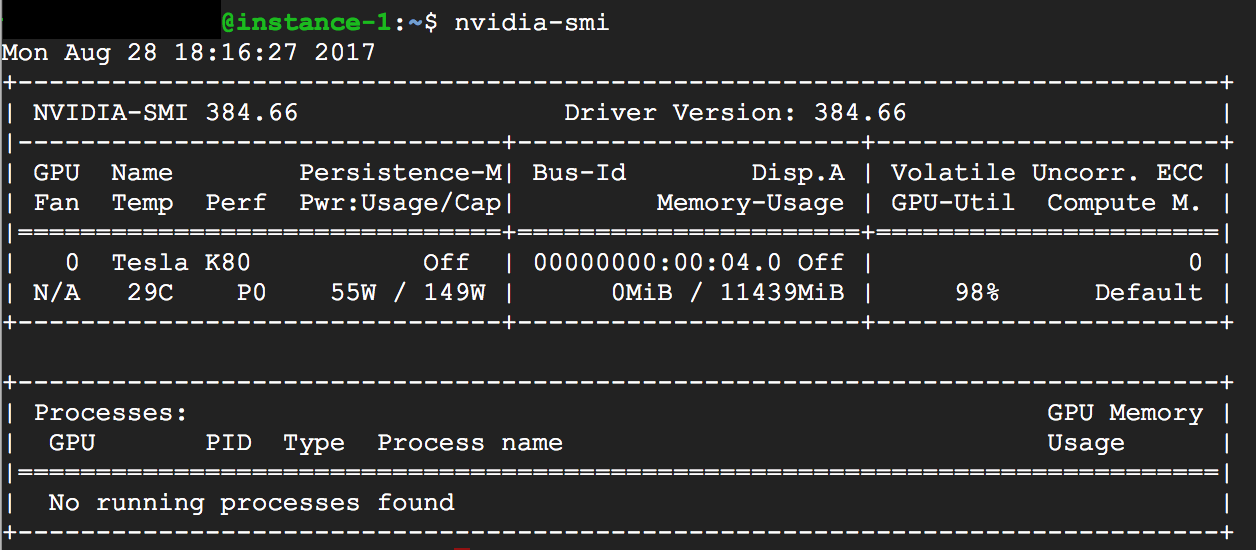
- After the script has finished running, run
nvidia-smito see if the drivers were installed correctly. You should see output similar to this:
Install cuDNN
touch cudnn_install.sh
vim cudnn_install.sh
press “i” for insert mode, and copy paste the following into the file:#!/bin/bash
CUDNN_TAR_FILE="cudnn-8.0-linux-x64-v5.1.tgz"
wget http://developer.download.nvidia.com/compute/redist/cudnn/v5.1/${CUDNN_TAR_FILE}
tar xvzf cudnn-8.0-linux-x64-v5.1.tgz
sudo cp -P cuda/include/cudnn.h /usr/local/cuda/include
sudo cp -P cuda/lib64/libcudnn* /usr/local/cuda/lib64
sudo chmod a+r /usr/local/cuda/include/cudnn.h /usr/local/cuda/lib64/libcudnn*# set environment variables
export PATH=/usr/local/cuda-8.0/bin${PATH:+:${PATH}}
export LD_LIBRARY_PATH=/usr/local/cuda-8.0/lib64\${LD_LIBRARY_PATH:+:${LD_LIBRARY_PATH}}
press “esc”, then type in “:wq” to save and exit the file.
- Allow execute permission of the file by running
chmod 755 cudnn_install.sh. - Execute cudnn_install.sh by running
sudo ./cudnn_install.sh - vim ~/.bashrc
- add the following to the bottom of the file:
export LD_LIBRARY_PATH=”$LD_LIBRARY_PATH:/usr/local/cuda/lib64:/usr/local/cuda/extras/CUPTI/lib64″
export CUDA_HOME=/usr/local/cuda - source ~/.bashrc
Install Miniconda, TensorFlow, and Keras
- Now let’s install Miniconda. Run the following to download the bash script:
wget https://repo.continuum.io/miniconda/Miniconda2-latest-Linux-x86_64.sh -O ~/miniconda.sh. If you are using a different OS, check out your other options in conda.io. - Run the script:
bash miniconda.sh. Follow the prompts, and leave all settings default:- Prepend path to .bashrc? Yes
- Close and reopen the terminal to put the changes into effect.
- Check if the installation is successful by running
conda list. You should see the following output:
- Install TensorFlow 1.0.1 and Keras 2.0.1 into a new conda environment by doing:
i.conda create -n ml python=3.6
ii.source activate ml
ii.conda install jupyter pandas numpy scipy scikit-image
iii.pip install --ignore-installed --upgrade https://storage.googleapis.com/tensorflow/linux/gpu/tensorflow_gpu-1.0.1-cp36-cp36m-linux_x86_64.whl
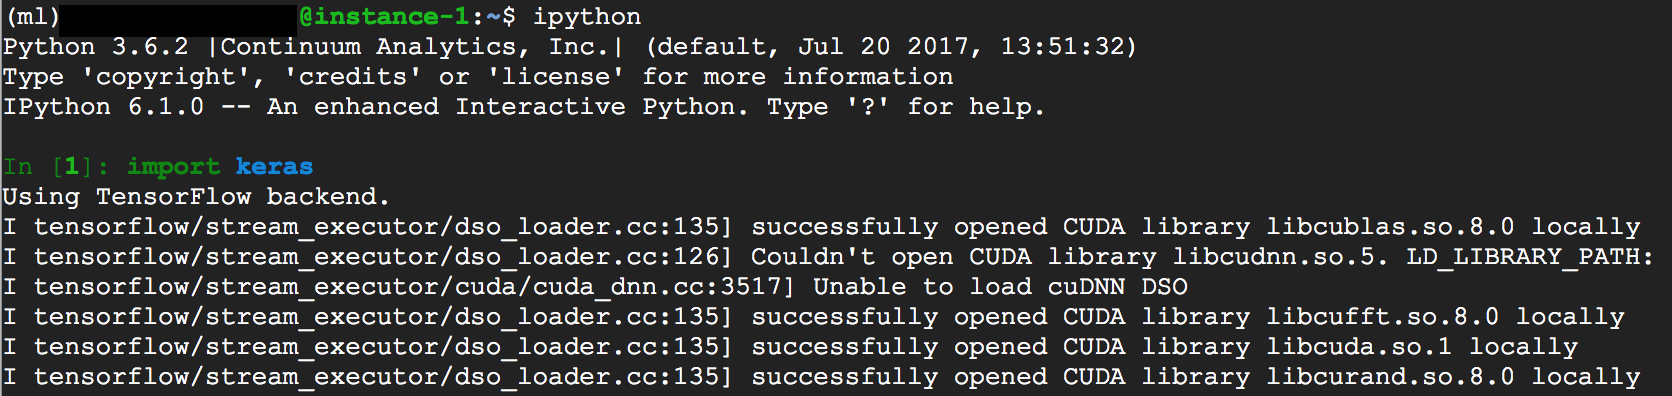
iv.pip install keras h5py - To test if the setup is working, run
ipythonand then typeimport keras. The output should look like:
Save Your Disk as an Image for Later
You will get billed each minute your Google Compute Instance is running. You will also get billed for persistent disks, even if they are not used by any instance. By creating a reusable disk image, you may delete instances and disks, and restart them with all of your software already installed. You may follow the official documentation, or the steps below.
- Stop the instance.
- Go to the VM instances page in the Cloud Platform Console.
- Select our project’s instance to stop.
- At the top of the VM instances page, click Stop.
- In the instance list, click on the instance name itself; this will take you to the edit screen.
- Click the edit button, and then uncheck
Delete boot disk when instance is deleted. - Click the save button.
- Delete the instance.
- Now go to the Create an Image screen. Create an image with the following properties:
Source: Disk
Source disk: instance-1 (or whatever your instance name was). - Create the image, and you’ll have all of your relevant software ready to go for future work!
Apply the resnet50 Neural Network on Images from the Interwebs
- Connect to your instance and run the following (You will need to be in the directory where the miniconda folder was installed):
-----@instance-1:~$ source miniconda2/bin/activate ml
- Navigate to the VPC network External IP addresses menu, and change your instances Type from Ephemeral to Static.
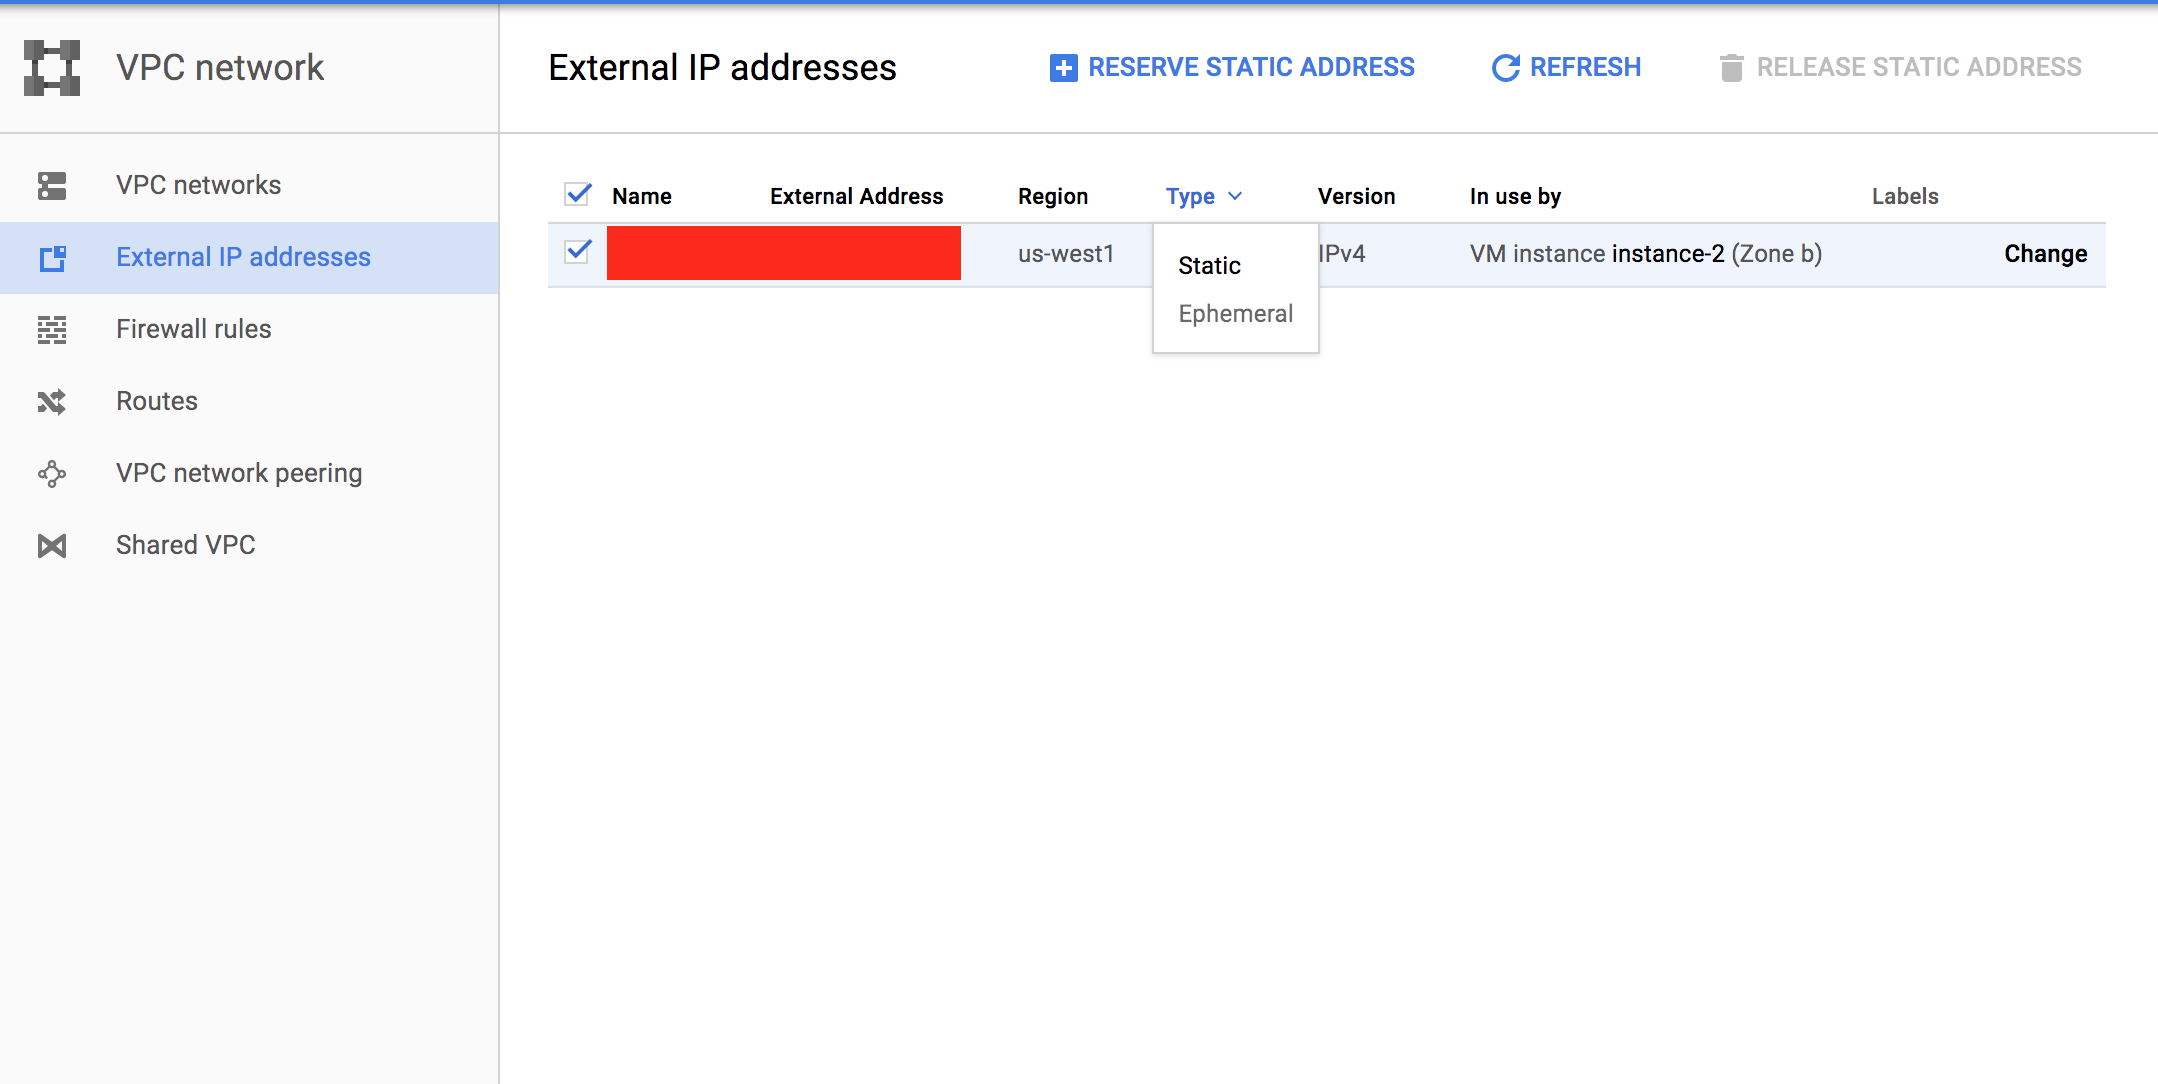
Tip – After you shut down your virtual instance, make sure to go back to this screen and release the static IP. Google will charge a small fee for unused static IPs on your account.Security Note – Accessing your instance openly over HTTP is not secure. It’s a good idea to password protect your notebook to prevent unauthorized access, or configure SSH tunneling. - Once the IP is promoted, launch the Juptyer Notebook in your default home directory. You will get permission denied errors otherwise. Run
cd ~before executing the following:
jupyter notebook --ip=0.0.0.0 --port=8888 --no-browserThe output should include a line like this:
“The Jupyter Notebook is running at: http://0.0.0.0:8888/?token=…….” - In a new terminal/tab, connect to the cloud using the following command (minus the brackets):
gcloud compute ssh "<your instance name>" --project "<your project id>" --zone "<your zone>" --ssh-flag="-L" --ssh-flag="2222:localhost:8888".
Here’s an example command:
gcloud compute ssh "instance-1" --project "neural-net-2-1...3" --zone "us-west1-b" --ssh-flag="-L" --ssh-flag="2222:localhost:8888" - Now, in your browser type:
http://localhost:2222/
It will ask you for the token that you were given above (use the string after the “token=”). Open your jupyter notebook! Voila 🙂
sudo nano /etc/ld.so.conf.d/nvidia.confAdd this:/usr/local/cuda-8.0/lib64/usr/local/cuda-8.0/librun
sudo ldconfigif it works well ,please tell me.
- If you get error: Permission denied: Untitled.ipynb
sudo chown winnyucui_dev1:winnyucui_dev1 ~/.local/share/jupyter - If you get error: Unexpected error while saving file: Untitled.ipynb attempt to write a readonly database
locate the .ipython hidden directory
sudo chown -R pyrinox:pyrinox .ipython - Go to your “VM Instances” page. You should see your instance running, with its detailed information listed. Click on the “SSH” button to ssh into this instance using Google’s Cloud Shell.
- Activate your saved conda environment by running
source activate ml. - Create a jupyter notebook by running
jupyter notebook.
ps aux | grep -i notebook
sudo kill -9 7324
Google recently announced the availability of GPUs on Google Compute Engine instances. For my deep learning experiments, I often need more beefy GPUs than the puny GTX 750Ti in my desktop workstation, so this was good news. To make the GCE offering even more attractive, their GPU instances are also available in their EU datacenters, which is in terms of latency a big plus for me here on the Southern tip of the African continent.
Last night I had some time to try this out, and in this post I would like to share with you all the steps I took to:
- Get a GCE instance with GPU up and running with miniconda, TensorFlow and Keras
- Create a reusable disk image with all software pre-installed so that I could bring up new instances ready-to-roll at the drop of a hat.
- Apply the pre-trained Resnet50 deep neural network on images from the web, as a demonstration that the above works. Thanks to Keras, this step is fun and fantastically straight-forward.
There are multiple ways to access your virtual machine through ssh. You can install Google Cloud’s SDK kit, you can use your native terminal, or you can use the Cloud Shell that Google provides to you directly through the web console. For the purposes of this guide, I’ll be using the web console Cloud Shell since it already has all the necessary tools installed, and is the most convenient method. You can find the Cloud Shell by locating it as the left most button in the top right corner of the nav bar.
1 Comment
pc speakers best buy
November 3, 2017 at 10:52 pmHello there! This post could not be written any better!
Reading through this post reminds me of my old room mate!
He always kept talking about this. I will forward this write-up to him.
Fairly certain he will have a good read. Many thanks for sharing!